

Short Description
Sheet Pan Baked Chicken Chimichangas offer a delicious, crispy, and healthier alternative to the traditional deep-fried version. Packed with a flavorful chicken filling and wrapped in a golden, crunchy tortilla, these chimichangas are baked to perfection using a single sheet pan. Perfect for a weeknight meal, this easy recipe ensures minimal cleanup and maximum flavor.

Why You’ll Love This Recipe
- Healthier Alternative – Unlike deep-fried chimichangas, these are baked, reducing the oil content while still delivering a crispy exterior.
- Easy and Convenient – Using just one sheet pan means fewer dishes to clean up afterward.
- Customizable – You can tweak the filling with your favorite ingredients, making it adaptable to various dietary needs.
- Family-Friendly – A meal that both kids and adults will enjoy.
- Make-Ahead Option – Prepare the filling in advance to make the cooking process even quicker.
Ingredients
- Cooked shredded chicken
- Cream cheese
- Shredded cheddar or Mexican blend cheese
- Salsa
- Green chilies
- Ground cumin
- Garlic powder
- Onion powder
- Salt
- Black pepper
- Flour tortillas
- Olive oil or melted butter
- Toppings: sour cream, guacamole, chopped cilantro, diced tomatoes, shredded lettuce
Directions
- Preheat Oven – Set your oven to 400°F (200°C) and line a baking sheet with parchment paper or lightly grease it with cooking spray.
- Prepare the Filling – In a large bowl, combine the shredded chicken, cream cheese, shredded cheese, salsa, green chilies, cumin, garlic powder, onion powder, salt, and black pepper. Mix well until evenly incorporated.
- Assemble the Chimichangas – Lay out the flour tortillas on a clean surface. Spoon a portion of the chicken mixture onto the center of each tortilla.
- Roll and Seal – Fold in the sides of each tortilla, then roll it up tightly like a burrito. Place seam-side down on the prepared baking sheet.
- Brush with Oil or Butter – Lightly brush each chimichanga with olive oil or melted butter to help achieve a crispy, golden-brown texture.
- Bake – Place the sheet pan in the preheated oven and bake for 20-25 minutes, flipping the chimichangas halfway through to ensure even crispiness.
- Serve – Remove from the oven and let them cool slightly. Serve with your favorite toppings like sour cream, guacamole, or fresh salsa.
Variations
- Spicy Kick – Add diced jalapeños or a dash of hot sauce to the filling for extra heat.
- Vegetarian Option – Replace the chicken with black beans, corn, and sautéed bell peppers.
- Different Proteins – Swap the chicken for shredded beef, pulled pork, or seasoned tofu.
- Low-Carb Version – Use low-carb tortillas or lettuce wraps instead.
- Extra Crunch – Sprinkle a bit of grated cheese on top before baking for an added crispy, cheesy layer.
Servings and Timing
- Prep Time: 15 minutes
- Cook Time: 25 minutes
- Total Time: 40 minutes
- Servings: 4-6 chimichangas
Storage/Reheating
- Refrigeration: Store leftover chimichangas in an airtight container in the refrigerator for up to 3 days.
- Freezing: Wrap each cooled chimichanga individually in foil and store in a freezer-safe bag for up to 2 months.
- Reheating: Reheat in a 375°F oven for 10-15 minutes, or air-fry at 350°F for 5-7 minutes to maintain crispiness. A microwave can be used but may result in a softer texture.
FAQs
1. Can I use rotisserie chicken for this recipe?
Yes! Rotisserie chicken is a great time-saving option and adds extra flavor.
2. How do I prevent the chimichangas from getting soggy?
Brushing them with oil before baking and placing them seam-side down helps maintain crispiness.
3. Can I make these ahead of time?
Yes! Assemble the chimichangas, wrap them tightly, and refrigerate them until ready to bake.
4. What’s the best way to flip them without breaking?
Use a spatula to carefully turn them over halfway through baking.
5. Can I use corn tortillas instead of flour tortillas?
Flour tortillas are recommended because they crisp up better when baked.
6. How do I make this recipe gluten-free?
Use gluten-free tortillas and check that all seasoning ingredients are gluten-free.
7. What type of cheese works best?
A blend of cheddar and Monterey Jack works well, but you can use any melting cheese of your choice.
8. Can I bake these in an air fryer?
Yes! Air fry at 375°F for 8-10 minutes, flipping halfway through.
9. How do I add more flavor to the filling?
Try adding taco seasoning, lime juice, or chopped fresh cilantro for an extra burst of flavor.
10. What sides pair well with chimichangas?
Mexican rice, refried beans, or a simple salad make great accompaniments.
Conclusion
Sheet Pan Baked Chicken Chimichangas are the perfect balance of crispy, cheesy, and flavorful without the excess oil of deep frying. Easy to prepare and packed with customizable fillings, they make a fantastic weeknight dinner or meal prep option. Try them today and enjoy a healthier take on a Mexican classic!
Print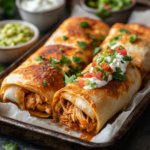
Sheet Pan Baked Chicken Chimichangas
- Total Time: 40 minutes
- Yield: 4–6 servings 1x
Description
Enjoy crispy, cheesy, and flavorful Sheet Pan Baked Chicken Chimichangas without the excess oil of deep frying. This easy, family-friendly recipe is perfect for weeknight dinners with minimal cleanup.
Ingredients
- 2 cups cooked shredded chicken
- 4 oz cream cheese, softened
- 1 cup shredded cheddar or Mexican blend cheese
- 1/2 cup salsa
- 1/4 cup diced green chilies
- 1 tsp ground cumin
- 1/2 tsp garlic powder
- 1/2 tsp onion powder
- 1/2 tsp salt
- 1/4 tsp black pepper
- 6 large flour tortillas
- 2 tbsp olive oil or melted butter
- Optional toppings: sour cream, guacamole, chopped cilantro, diced tomatoes, shredded lettuce
Instructions
- Preheat Oven – Set oven to 400°F (200°C) and line a baking sheet with parchment paper or lightly grease with cooking spray.
- Prepare the Filling – In a large bowl, combine shredded chicken, cream cheese, shredded cheese, salsa, green chilies, cumin, garlic powder, onion powder, salt, and black pepper. Mix well.
- Assemble the Chimichangas – Lay out flour tortillas and spoon a portion of the filling onto the center of each tortilla.
- Roll and Seal – Fold in the sides of each tortilla, then roll it up tightly like a burrito. Place seam-side down on the baking sheet.
- Brush with Oil or Butter – Lightly brush each chimichanga with olive oil or melted butter for a golden-brown finish.
- Bake – Place in the oven and bake for 20-25 minutes, flipping halfway through for even crispiness.
- Serve – Let cool slightly and serve with your favorite toppings.
Notes
- Spicy Kick – Add diced jalapeños or hot sauce to the filling.
- Vegetarian Option – Replace chicken with black beans, corn, and sautéed bell peppers.
- Different Proteins – Use shredded beef, pulled pork, or seasoned tofu instead of chicken.
- Low-Carb Version – Swap flour tortillas for low-carb tortillas or lettuce wraps.
- Extra Crunch – Sprinkle grated cheese on top before baking for a crispy, cheesy layer.
- Prep Time: 15 minutes
- Cook Time: 25 minutes
- Category: Main Course
- Method: Baking
- Cuisine: American
Keywords: Baked chimichangas, sheet pan chimichangas, healthy Mexican recipes, easy weeknight dinners, crispy baked tortillas


No comment