

Quick Baseball Cake: A Home Run Dessert for Any Occasion! ⚾🍰🏆
1. Introduction
Looking for a dessert that’s a guaranteed grand slam? This baseball cake recipe is not only delicious, but also surprisingly easy to create, making it perfect for parties, game-day celebrations, or any occasion that calls for a bit of fun. Forget spending hours in the kitchen; this quick cake recipe provides a bakery-worthy treat without all the fuss. It truly tastes like it came straight from a professional bakery! With readily available ingredients and easy-to-follow instructions, you can make a themed cake recipe that will wow your guests. This isn’t just a simple recipe; it’s an experience. Whether you’re an experienced baker or just starting out, this bakery style cake is designed to be a winner. It’s much easier than you might think!
Consider exploring other delightful desserts on our site! You might especially enjoy our Lemon Poppy Seed Cake recipe for another easy win.
2. Ingredients You’ll Need
Before you start, make sure you have all your ingredients ready. Here’s what you’ll need for this amazing baseball creation:
- 1 box (15.25 oz) cake mix (vanilla or white): This serves as the base for our cake.
- 1 cup water: Adds moisture to the cake.
- 1/2 cup vegetable oil: Ensures a moist and tender crumb.
- 3 large eggs: Binds the ingredients together and adds richness.
- 1 container (16 oz) vanilla frosting: The canvas for our baseball design.
- Red food coloring: To achieve that vibrant baseball red!
- White decorating icing: For the iconic baseball stitches.
- Black decorating icing: To add detail to the stitches and complete the look.
3. Essential Equipment
Having the right tools makes all the difference. Here’s what you’ll need to build your baseball masterpiece:
- Two 9-inch round cake pans: To bake the cake layers.
- Mixing bowls: For preparing the batter and frosting.
- Electric mixer: To ensure a smooth and well-combined batter.
- Spatula: For scraping down the sides of the bowl and spreading frosting.
- Toothpicks: Helpful for testing the cake’s doneness.
- Piping bags or Ziploc bags: For decorating the cake with icing.
- Round cake board or serving plate: To display your finished creation.
4. Step-by-Step Instructions
Let’s get baking! Follow these simple steps to create your baseball cake:
Step 1: Prepare the Cake Batter
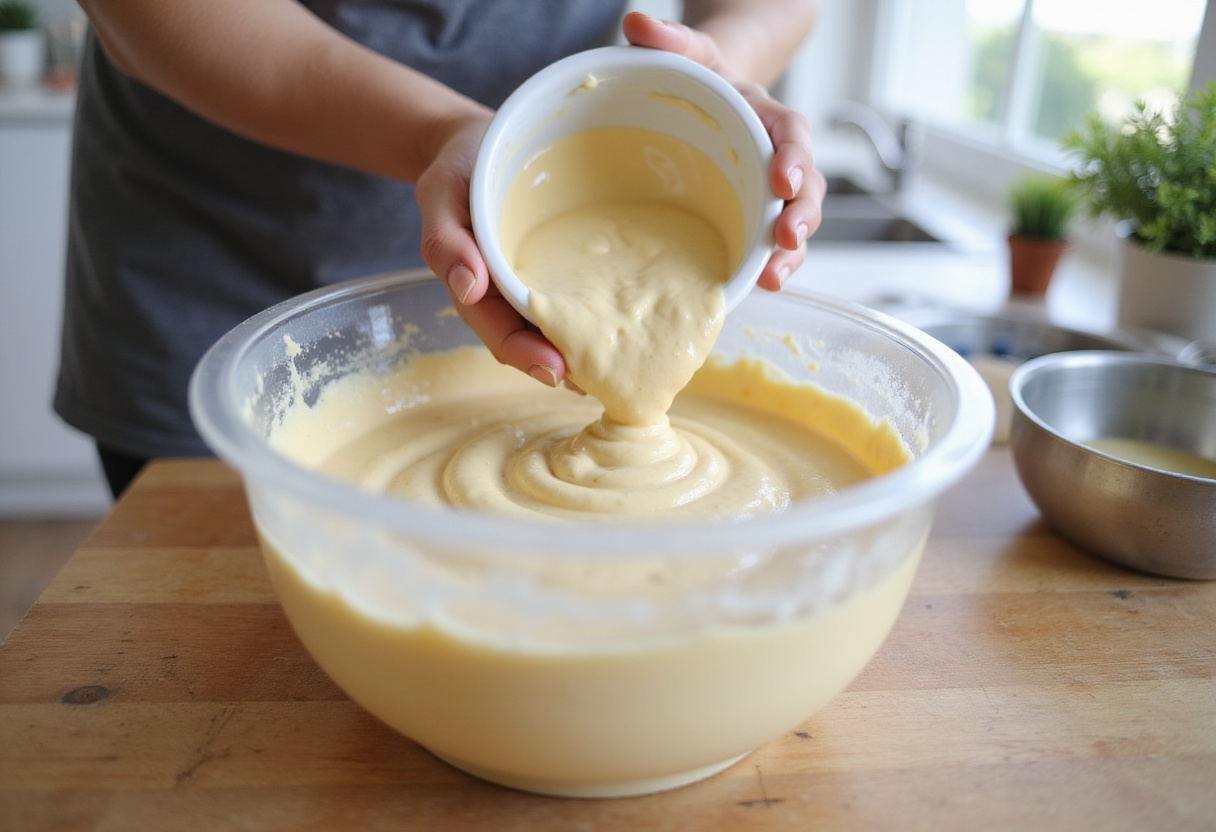
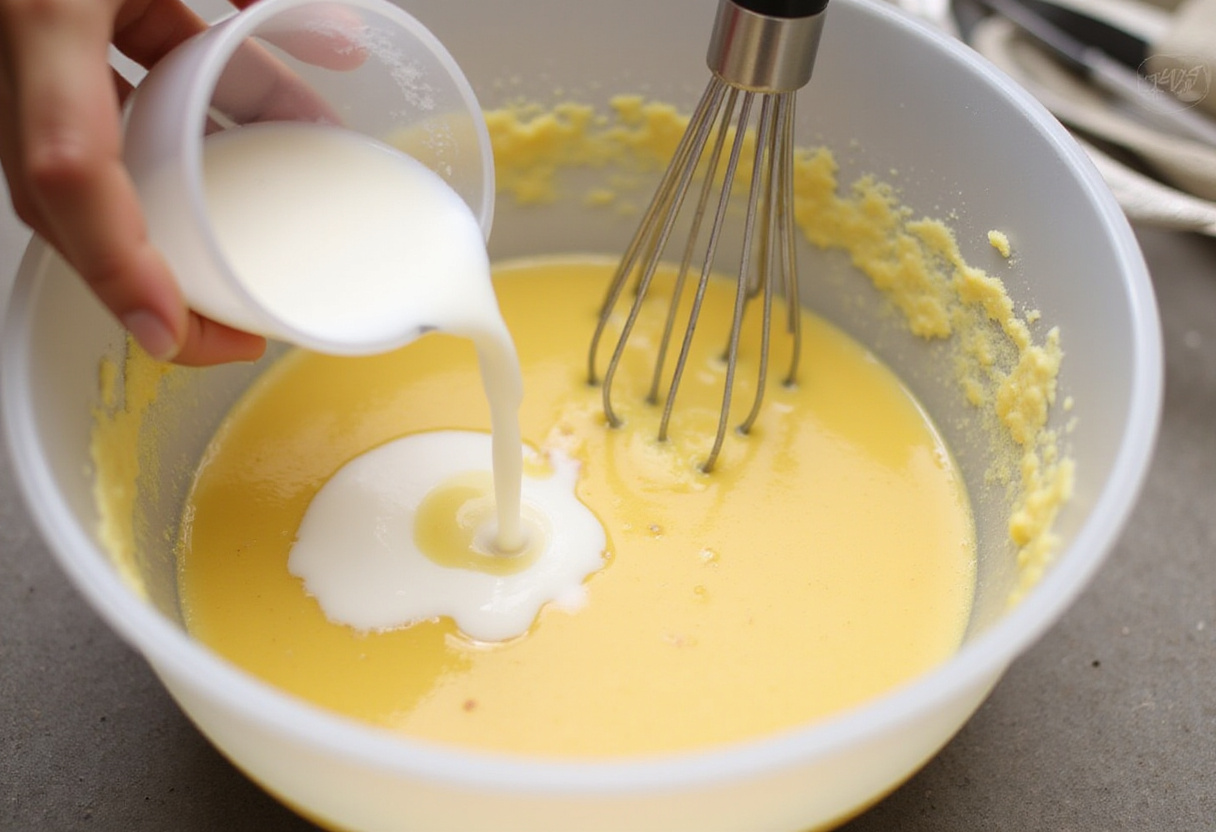
First things first, preheat your oven to 350°F (175°C). Grease and flour your two 9-inch round cake pans. This prevents the cakes from sticking. In a large mixing bowl, combine the cake mix, water, vegetable oil, and eggs. Use your electric mixer to beat these ingredients together until well combined – usually about 2-3 minutes. Make sure there are no lumps; a smooth batter is key to achieving that perfect bakery style cake texture.
Step 2: Bake the Cakes
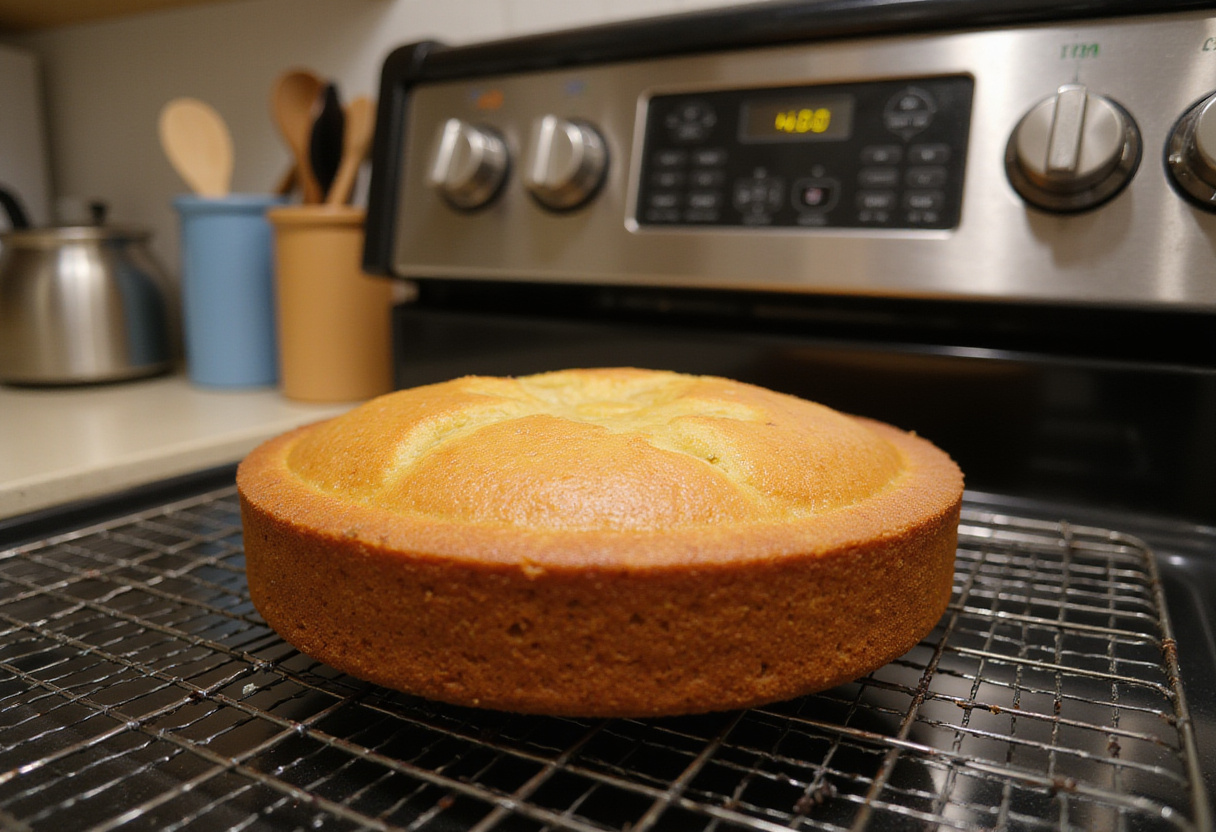
Now it’s time to bake! Evenly divide the batter between your two prepared cake pans. Pop them into the preheated oven and bake for approximately 25-30 minutes. A simple test will tell you when they’re ready: insert a toothpick into the center of a cake, and if it comes out clean, you’re good to go. Allow the cakes to cool in the pans for about 10 minutes before inverting them onto a wire rack to cool completely. Remember, completely cooled cakes are essential for perfect frosting application – critical for any successful baseball cake recipe.
Step 3: Frost and Assemble
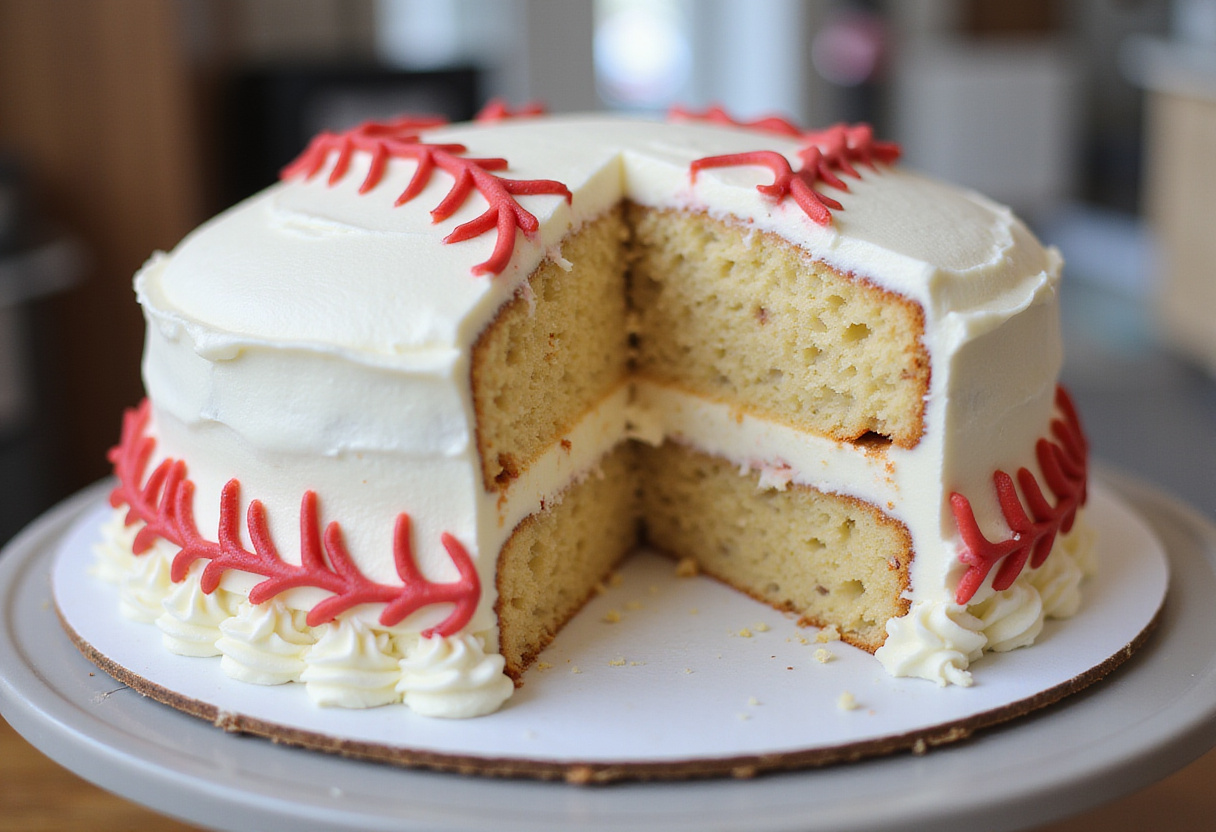
While the cakes are cooling, it’s time to get the frosting ready. Take about 1/4 cup of the vanilla frosting and set it aside. This will be used for the white stitching. Add red food coloring to the remaining vanilla frosting, mixing until you get that classic, vibrant red baseball color. Once the cakes are completely cooled (patience is key!), place one layer on your cake board or serving plate. Frost generously with your red frosting, then carefully place the second layer on top. Frost the entire cake with the remaining red frosting, ensuring a smooth, even surface.

Step 4: Decorate the Baseball
Here comes the fun part – turning your frosted cake into a baseball! Using the reserved white decorating icing, carefully pipe curved lines to mimic the stitching on a baseball. If you aren’t sure what it should look like, refer to pictures of real baseballs for accuracy. Then, use the black decorating icing to add those small, defining dashes along the white stitching lines. Remember, for a truly quick cake recipe, keep the decorations relatively simple but effective. And if you want some inspiration, check out this fantastic baseball cake tutorial.
5. Tips for a Perfect Baseball Cake
Want your baseball cake to be a true showstopper? Here are some insider tips:
- Always make sure your cakes are completely cooled before even thinking about frosting. This prevents melting and ensures a smooth finish.
- Using a turntable is a baker’s secret weapon. It makes frosting the cake evenly a breeze.
- Chilling the cake for about 30 minutes after frosting helps the icing set, making decorating easier.
- No piping bags? No problem! Ziploc bags with a small corner snipped off work just as well in a pinch.
6. Variations and Creative Twists
Feel like adding your own personal touch? Here are some creative variations to try:
- Add chocolate chips to the cake batter for an extra bit of indulgence.
- Experiment with different flavored frostings, such as chocolate or cream cheese. They can add a unique and delicious twist.
- Create a baseball diamond cake. Use a rectangular cake pan and decorate with green frosting for the field and white icing for the base paths.
- Personalize the cake with a team logo or player’s name using icing.
If you’re looking to explore more cake options, you might browse our dessert category for inspiration!
7. Serving Suggestions
Serve this baseball cake recipe at room temperature to unlock its full flavor potential. For an extra special experience, pair it with a scoop of creamy vanilla ice cream or a dollop of freshly whipped cream. It’s the perfect centerpiece for any baseball-themed party or celebration. This themed cake recipe is sure to be a grand slam!
Looking for other baseball party ideas? Why not incorporate a delicious breakfast bar the next morning or a hearty dinner spread to kick off the celebration?
8. Storage Instructions
Got leftovers? Lucky you! Store any leftover cake in an airtight container at room temperature for up to 3 days or in the refrigerator for up to a week. For longer storage, you can freeze the cake (either unfrosted or frosted) for up to 2-3 months. Just make sure to thaw it completely before serving.
9. Conclusion
This quick baseball cake is more than just a dessert; it’s a fun and festive way to celebrate your love for the game and share that joy with friends and family. The simple steps and impressive presentation of our bakery style cake recipe will be a guaranteed crowd-pleaser, even if baking isn’t your forte. So, grab your apron, gather your ingredients, and get ready to create a home run masterpiece. Enjoy making – and especially sharing – this delightful themed cake recipe with the baseball fans in your life!
We’re always striving to bring you the best recipes. Check out our homepage for even more great ideas, and you can learn more about me!
Print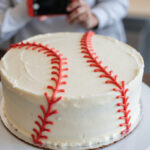
Quick Baseball Cake That Tastes Like It’s from a Bakery
- Total Time: 50 minutes
- Yield: 12 servings 1x
- Diet: Vegetarian
Description
Score big with this Quick Baseball Cake recipe! Perfect for parties, this bakery-style cake is easy to make and tastes amazing. A home run dessert for baseball fans!
Ingredients
- 1 box (15.25 oz) cake mix (vanilla or white)
- 1 cup water
- 1/2 cup vegetable oil
- 3 large eggs
- 1 container (16 oz) vanilla frosting
- Red food coloring
- White decorating icing
- Black decorating icing
Instructions
- Preheat oven to 350°F (175°C). Grease and flour two 9-inch round cake pans.
- In a large mixing bowl, combine cake mix, water, vegetable oil, and eggs. Beat until well combined (2-3 minutes).
- Divide batter evenly between cake pans.
- Bake for 25-30 minutes, or until a toothpick inserted into the center comes out clean.
- Let cakes cool in pans for 10 minutes, then invert onto a wire rack to cool completely.
- Set aside 1/4 cup vanilla frosting. Add red food coloring to remaining frosting.
- Place one cake layer on a serving plate. Frost with red frosting.
- Place second cake layer on top and frost entire cake with remaining red frosting.
- Using white decorating icing, pipe curved lines to mimic baseball stitching.
- Use black decorating icing to add small dashes along white stitching lines.
Notes
- Ensure cakes are completely cooled before frosting.
- Use a turntable for even frosting.
- Chill the cake for 30 minutes after frosting to help the icing set.
- Use Ziploc bags with a small corner cut off as makeshift piping bags if needed.
- Prep Time: 20 minutes
- Cook Time: 30 minutes
- Category: Dessert
- Method: Baking
- Cuisine: American
Nutrition
- Serving Size: 1 slice
- Calories: 350 Kcal
- Sugar: 40g
- Sodium: 250mg
- Fat: 15g
- Saturated Fat: 5g
- Unsaturated Fat: 9g
- Trans Fat: 0g
- Carbohydrates: 50g
- Fiber: 1g
- Protein: 3g
- Cholesterol: 50mg
Keywords: baseball cake, cake recipe, themed cake, quick cake recipe, bakery style cake, party cake, sports cake


No comment