

My Go-To Recipe for Amazing Barbie Cake: A Dreamy Dessert for Princess Parties! 🎂👑💖
1. Introduction
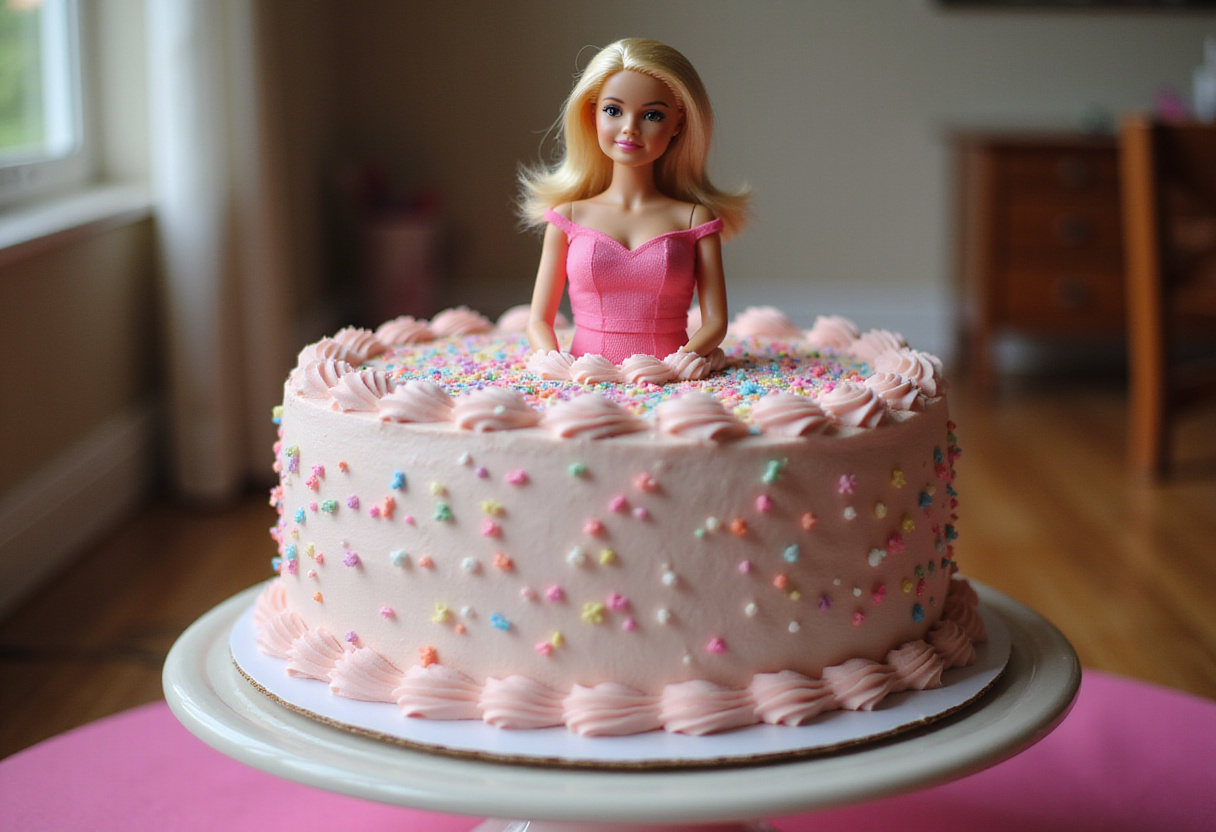
Creating an amazing Barbie cake is a fantastic way to bring joy to any celebration, especially birthday parties. There’s something truly special about presenting a beautifully decorated cake inspired by a beloved doll! This go-to recipe ensures that you can make a stunning and delicious Barbie doll cake with ease. In this article, we’ll guide you through each step, from baking the perfect cake layers to the final, dazzling decorations. Whether you call it a Barbie cake recipe, Princess cake recipe, or simply a doll cake, the result will be a centerpiece that captivates and delights.
Making a Barbie cake isn’t just about baking; it’s about creating a magical experience. It’s about turning a simple dessert into a work of art that sparks imagination and excitement. From choosing the right flavors to perfecting the frosting techniques, every detail contributes to the overall enchantment. If you’re looking for other delicious dessert ideas, check out our desserts category for more inspiration! So, grab your apron, and let’s get started on this exciting baking adventure! And if you are at it, why not check this recipe for more inspiration as well.
2. Ingredients Needed
Before you begin crafting this majestic Barbie cake, ensure you have all the necessary ingredients. Here’s a comprehensive list to help you get started:
- Cake Mix: 2 boxes of your favorite cake mix (vanilla or strawberry are great choices). Selecting high-quality cake mixes ensures a moist and flavorful base for your Barbie Cake recipe.
- Eggs: As required by the cake mix instructions.
- Oil: As required by the cake mix instructions.
- Water/Milk: As required by the cake mix instructions. Using milk instead of water can add richness and moisture to the cake.
- Frosting: 2-3 containers of your favorite frosting (pink, white, or a combination). Consider using a buttercream frosting for its smooth texture and easy workability.
- Food Coloring: Pink or any color you prefer for the dress. Gel food coloring is recommended for vibrant colors without altering the frosting’s consistency.
- Sprinkles: For added decoration. Opt for a variety of sprinkles to add texture and visual appeal to the dress.
- Barbie Doll: One new, clean Barbie doll (wrap legs in plastic wrap). Make sure the doll is clean and sanitized before inserting it into the cake.
3. Equipment Required
Having the right equipment on hand can make the baking and decorating process much smoother. Here’s what you’ll need:
- Mixing Bowls: A set of different-sized bowls is essential for preparing the batter and frosting.
- Measuring Cups and Spoons: Accurate measurements are crucial for baking success.
- Electric Mixer: An electric mixer will save you time and effort when creaming ingredients and whipping frosting.
- Baking Pans: One Bundt pan and two 9-inch round pans. The Bundt pan creates the base of the dress, while the round pans add height and volume.
- Serrated Knife: For leveling the cake layers to ensure an even stack.
- Spatula: For smoothing frosting and transferring batter.
- Cake Decorating Supplies: Piping bags and tips (optional). These tools allow you to create intricate designs and add a professional touch.
- Cake Stand or Plate: For displaying your gorgeous creation.
4. Step-by-Step Instructions
Follow these detailed instructions to create your own amazing Barbie cake. Each step is crafted to ensure even beginner bakers can achieve stunning results!
1. Baking the Cake Layers
Begin by preparing your cake batter according to the cake mix instructions. For an extra touch of flavor, you might consider adding a teaspoon of vanilla extract or a pinch of almond extract to the batter. Divide the batter evenly into the Bundt pan and the two 9-inch round pans. Bake as directed until a toothpick inserted into the center comes out clean. Let the cakes cool in the pans for about 10 minutes before transferring them to a wire rack to cool completely. This step is crucial for creating a stable base for your Barbie doll cake. Cooling the cakes completely prevents them from crumbling when you start assembling.
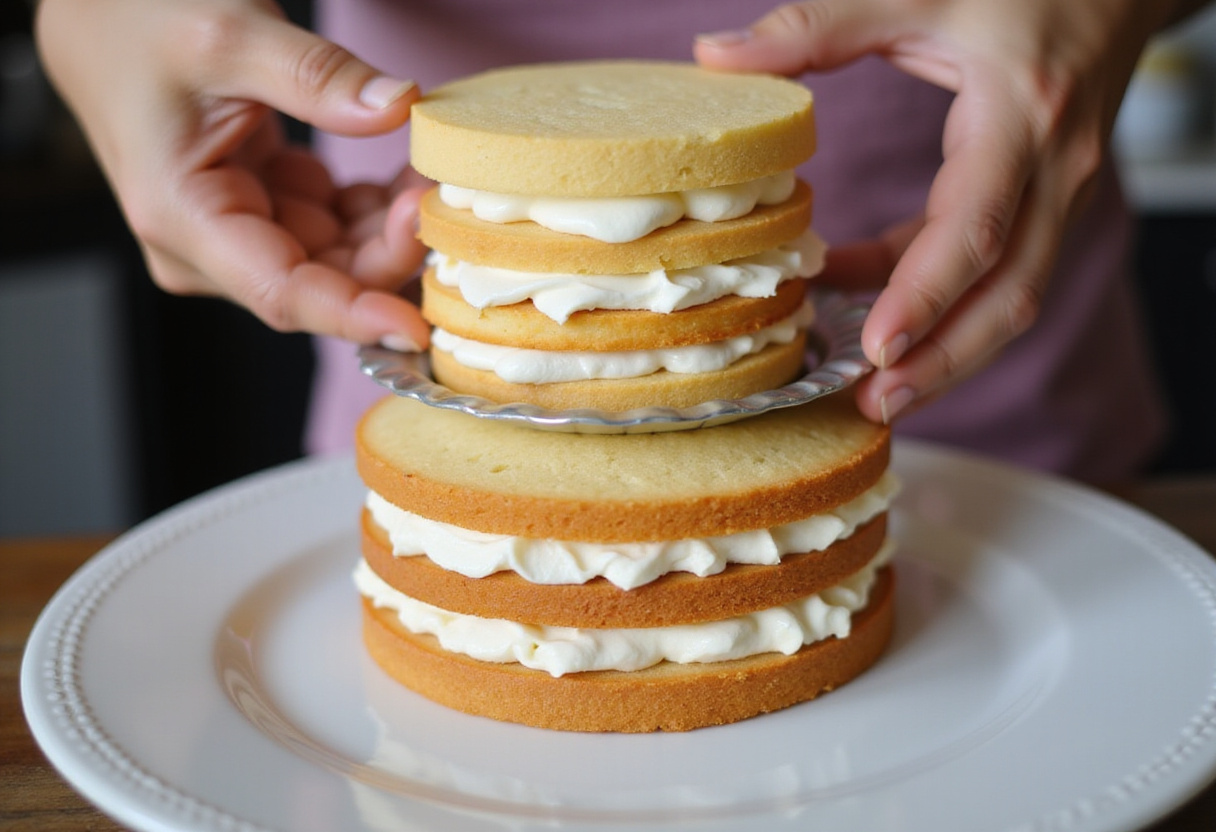
2. Assembling the Cake
Once the cakes are completely cool, level the top of the round cakes with a serrated knife to ensure they stack evenly. This prevents the cake from being lopsided. Place one round cake on your cake stand or plate, and spread a generous layer of frosting on top. Add the second round cake and another layer of frosting. Carefully place the Bundt cake on top to create the skirt shape for the amazing Barbie cake. This tiered structure forms the base of the doll’s dress. Consider using a thin cardboard cake round between the layers for added stability.
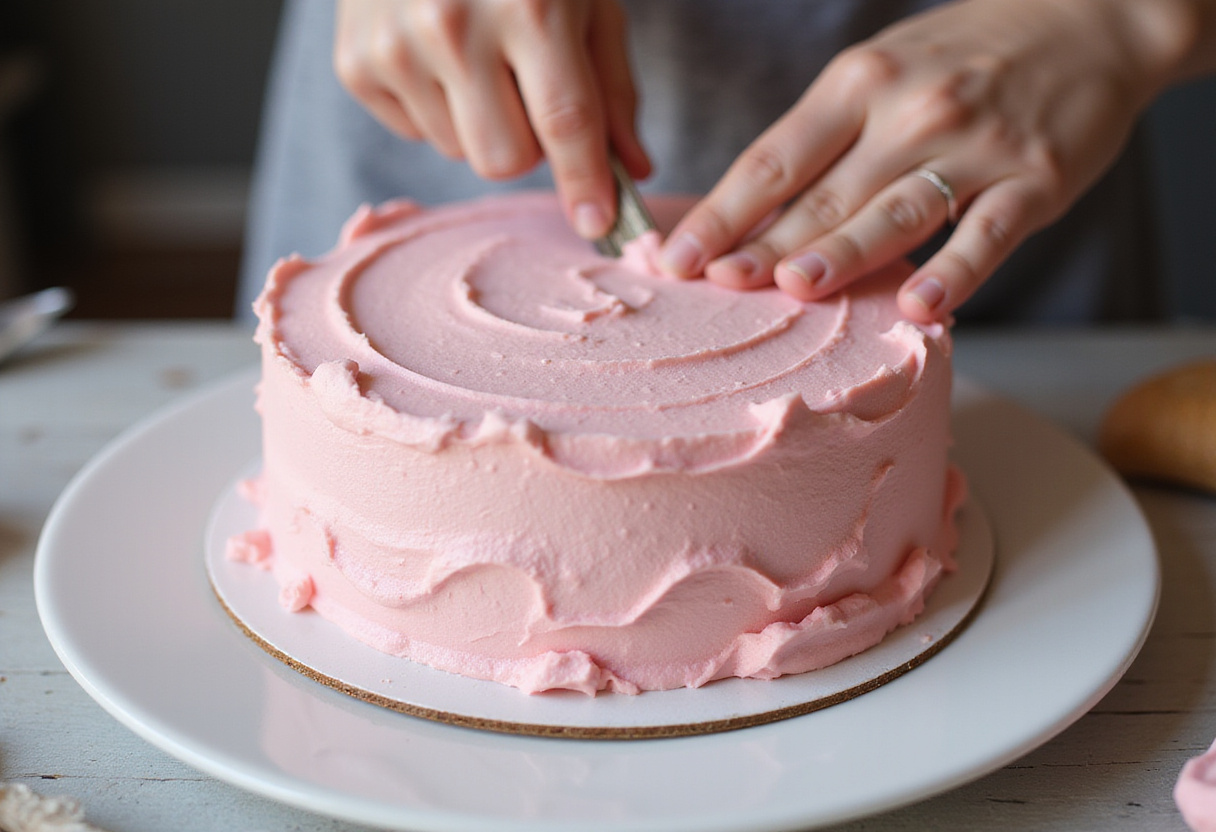
3. Frosting and Decorating
Tint your frosting with pink food coloring, or use pre-colored frosting. Generously frost the entire cake, smoothing it out as much as possible. For a flawless finish, consider using a hot knife or spatula to smooth the frosting. Use a piping bag to create decorative ruffles, rosettes, or other designs to resemble a dress. Get creative with your frosting techniques to make a unique Princess cake recipe. Experiment with different piping tips to achieve various textures and patterns. Add sprinkles for extra sparkle and fun! Edible glitter or sugar pearls can also enhance the overall look.
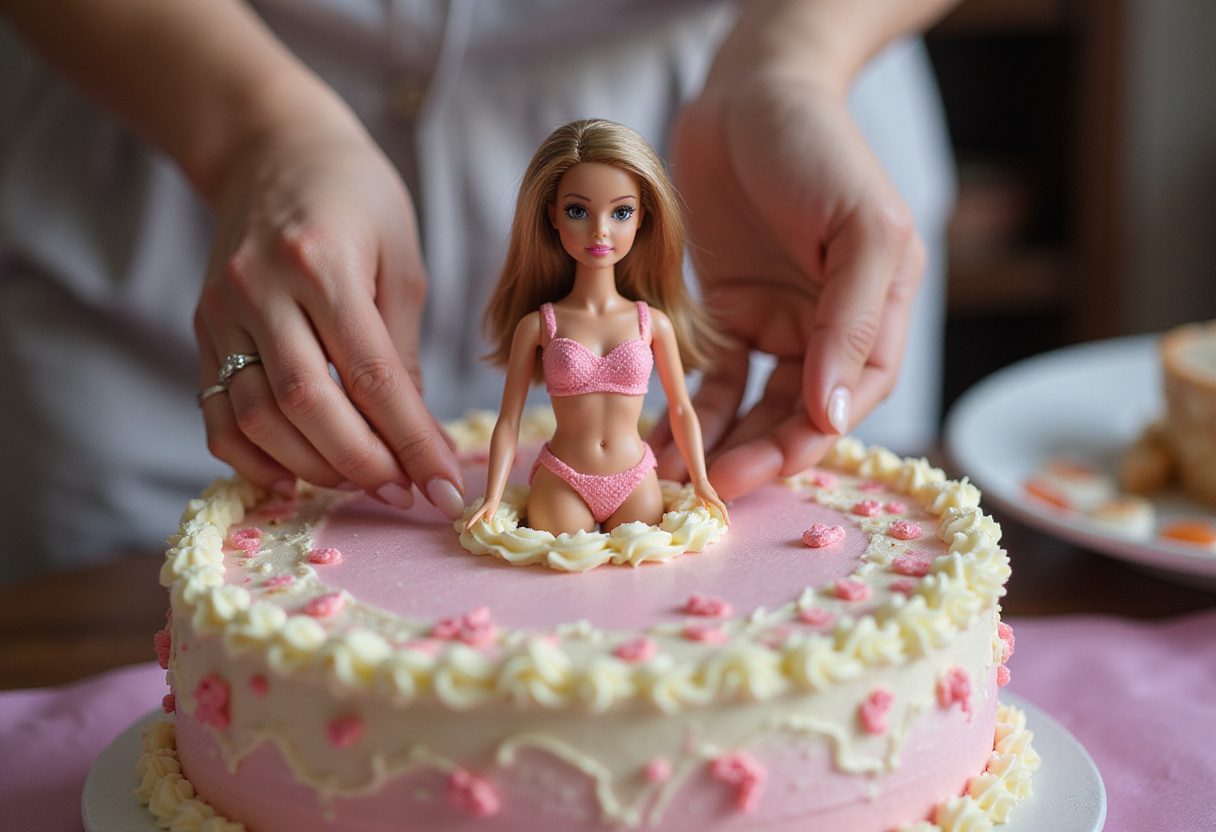
4. Adding the Barbie Doll
Wrap the Barbie doll’s legs in plastic wrap to keep them clean. Carefully insert the doll into the center of the cake, making sure she stands securely. Use extra frosting to blend the doll’s bodice with the cake, creating a seamless dress effect. This step brings your Barbie cake recipe to life! You can use a small amount of frosting to create a bodice for the doll, blending it seamlessly with the cake dress. If you’re interested in other recipes, you might enjoy our lemon poppy seed cake recipe!
5. Tips for Success
Here are some additional tips to ensure your Barbie cake turns out perfectly:
- Use a turntable for easier frosting. This allows you to rotate the cake while applying frosting evenly.
- Chill the cake layers before frosting to prevent crumbs. Cold cake is firmer and less likely to crumble.
- Experiment with different frosting techniques for unique dress designs. Try ombre effects, textured finishes, or intricate piping.
- Ensure the Barbie doll is clean and securely placed. A stable doll is essential for the cake’s presentation.
6. Customization Options
Make your Barbie cake truly unique with these customization ideas:
- Cake Flavors: Try chocolate, lemon, or marble cake for variety. Each flavor adds a different dimension to the dessert.
- Frosting Colors: Use different shades of pink, purple, or even rainbow colors. Match the frosting to the party’s theme or the birthday girl’s favorite colors.
- Decorations: Add edible pearls, fondant flowers, or glitter for extra glam. These details can elevate the cake to a professional-looking masterpiece.
7. Serving Suggestions
Serve the amazing Barbie cake as the centerpiece of your party. Cut slices carefully around the doll, ensuring each piece includes a bit of the beautifully decorated dress. Pair with ice cream or fresh fruit for a complete dessert experience. A scoop of vanilla ice cream or a side of fresh berries complements the cake perfectly.
8. Storage Instructions
Store leftover cake in an airtight container in the refrigerator. It’s best consumed within 2-3 days to maintain its freshness and flavor. To prevent the cake from drying out, you can also wrap individual slices in plastic wrap before storing them.
9. Conclusion
Creating a Barbie cake recipe is a delightful project that brings joy and excitement to any celebration. With this go-to recipe and the detailed instructions, you can confidently bake and decorate a stunning Princess cake recipe that will impress everyone. Don’t be afraid to get creative and put your personal touch on the design! For more about me and my recipes, visit the about me page. Enjoy the process and the magical smiles it brings! Baking is more than just following a recipe; it’s about creating memories and sharing love through delicious creations. You can always head to the homepage for more ideas.
Print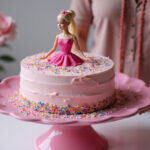
My Go-To Recipe for Amazing Barbie Cake
- Total Time: 1 hour 5 minutes
- Yield: 12 servings
- Diet: Vegetarian
Description
Bake a show-stopping Barbie cake with this easy-to-follow recipe! Perfect for birthdays and princess-themed parties, this doll cake is sure to impress. Learn how to make a delicious and beautiful Barbie cake with simple ingredients and step-by-step instructions.
Ingredients
- Cake Mix: 2 boxes of your favorite cake mix (vanilla or strawberry are great choices)
- Eggs: As required by the cake mix instructions
- Oil: As required by the cake mix instructions
- Water/Milk: As required by the cake mix instructions
- Frosting: 2-3 containers of your favorite frosting (pink, white, or a combination)
- Food Coloring: Pink or any color you prefer for the dress
- Sprinkles: For added decoration
- Barbie Doll: One new, clean Barbie doll (wrap legs in plastic wrap)
Instructions
- Baking the Cake Layers: Begin by preparing your cake batter according to the cake mix instructions. Divide the batter evenly into the Bundt pan and the two 9-inch round pans. Bake as directed until a toothpick inserted into the center comes out clean. Let the cakes cool in the pans for about 10 minutes before transferring them to a wire rack to cool completely. This step is crucial for creating a stable base for your Barbie doll cake.
- Assembling the Cake: Once the cakes are completely cool, level the top of the round cakes with a serrated knife to ensure they stack evenly. Place one round cake on your cake stand or plate, and spread a layer of frosting on top. Add the second round cake and another layer of frosting. Carefully place the Bundt cake on top to create the skirt shape for the amazing Barbie cake. This tiered structure forms the base of the doll’s dress.
- Frosting and Decorating: Tint your frosting with pink food coloring, or use pre-colored frosting. Generously frost the entire cake, smoothing it out as much as possible. Use a piping bag to create decorative ruffles, rosettes, or other designs to resemble a dress. Get creative with your frosting techniques to make a unique Princess cake recipe. Add sprinkles for extra sparkle and fun!
- Adding the Barbie Doll: Wrap the Barbie doll’s legs in plastic wrap to keep them clean. Carefully insert the doll into the center of the cake, making sure she stands securely. Use extra frosting to blend the doll’s bodice with the cake, creating a seamless dress effect. This step brings your Barbie cake recipe to life!
Notes
- Use a turntable for easier frosting.
- Chill the cake layers before frosting to prevent crumbs.
- Experiment with different frosting techniques for unique dress designs.
- Ensure the Barbie doll is clean and securely placed.
- Prep Time: 30 minutes
- Cook Time: 35 minutes
- Category: Dessert
- Method: Baking
- Cuisine: American
Nutrition
- Serving Size: 1 slice
- Calories: 450 Kcal
- Sugar: 50g
- Sodium: 250mg
- Fat: 22g
- Saturated Fat: 10g
- Unsaturated Fat: 10g
- Trans Fat: 0g
- Carbohydrates: 60g
- Fiber: 1g
- Protein: 4g
- Cholesterol: 75mg
Keywords: Barbie cake, doll cake, princess cake, birthday cake, cake decorating, kids party, homemade cake, party dessert, cake recipe


No comment