

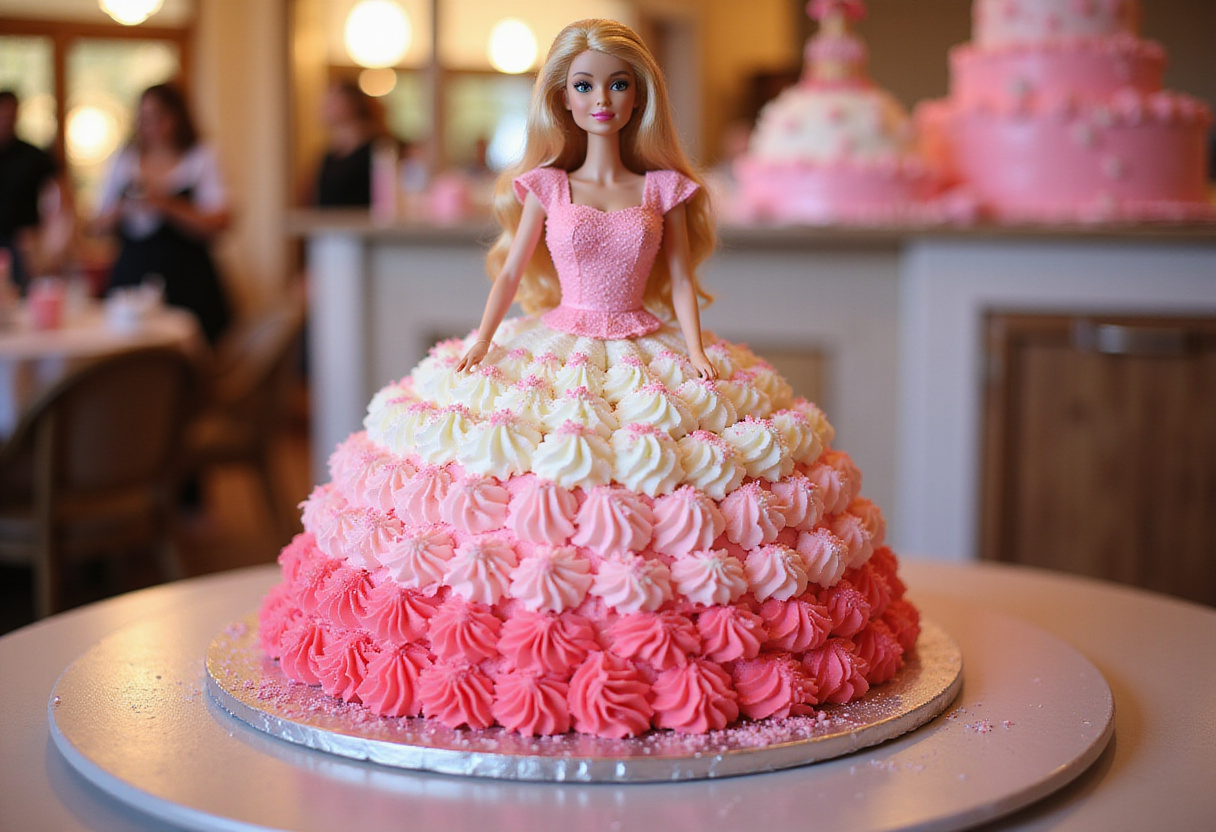
Barbie Cake: A Dreamy Delight for Princess Parties 🎂👑💖
1. Introduction
The Barbie cake is more than just a dessert; it’s a show-stopping centerpiece that brings a touch of magic to any celebration, especially princess-themed parties and birthdays. Imagine the delight on a child’s face when they see this stunning creation! This delightful treat combines the fun of a Barbie doll cake with the deliciousness of homemade cake and frosting. Creating a doll cake recipe might seem like a challenge fit for a professional baker, but with a few simple steps and our detailed guide, you can craft a stunning centerpiece that will wow your guests. Don’t be intimidated! Whether you call it a princess cake or simply a Barbie doll cake, the result is a whimsical, edible masterpiece that captures the imagination and makes any event unforgettable. Get ready to embark on a sweet adventure with this enchanting Barbie cake recipe! It’s going to be fun! If you’re looking for more dessert ideas, check out our desserts category for inspiration.
2. Understanding the Barbie Cake Recipe
Before diving into the specifics of the Barbie cake recipe, it’s really important to understand the key elements that make this cake so special. The cake itself is typically made from layers of round cakes, all stacked and carefully shaped to create a dress-like form. This provides the structure and volume needed for that signature Barbie gown look. A genuine Barbie doll is then lovingly inserted into the center of this cake creation, instantly transforming her into the “princess” of the cake. The frosting isn’t just a topping; it’s an integral part of the design. It’s used to meticulously create the dress itself, often in vibrant, eye-catching colors and with intricate designs that bring the whole thing to life. This doll cake recipe isn’t only about how it tastes, but also about its spectacular presentation, making it a genuinely perfect project for bakers who love to express their creativity and make something truly magnificent!
3. Ingredients for Your Barbie Doll Cake
To create your perfect Barbie doll cake, you’ll need to gather the following ingredients. Think of it as preparing your artist’s palette for creating a masterpiece:
- Cake Mix: Two boxes of your favorite cake mix. Vanilla is classic, but Chocolate or Strawberry work beautifully too, offering different flavor profiles to your creation.
- Eggs, Oil, and Water: Check your cake mix instructions and have these on hand as required. These ingredients play a crucial role in the cake’s moisture and texture.
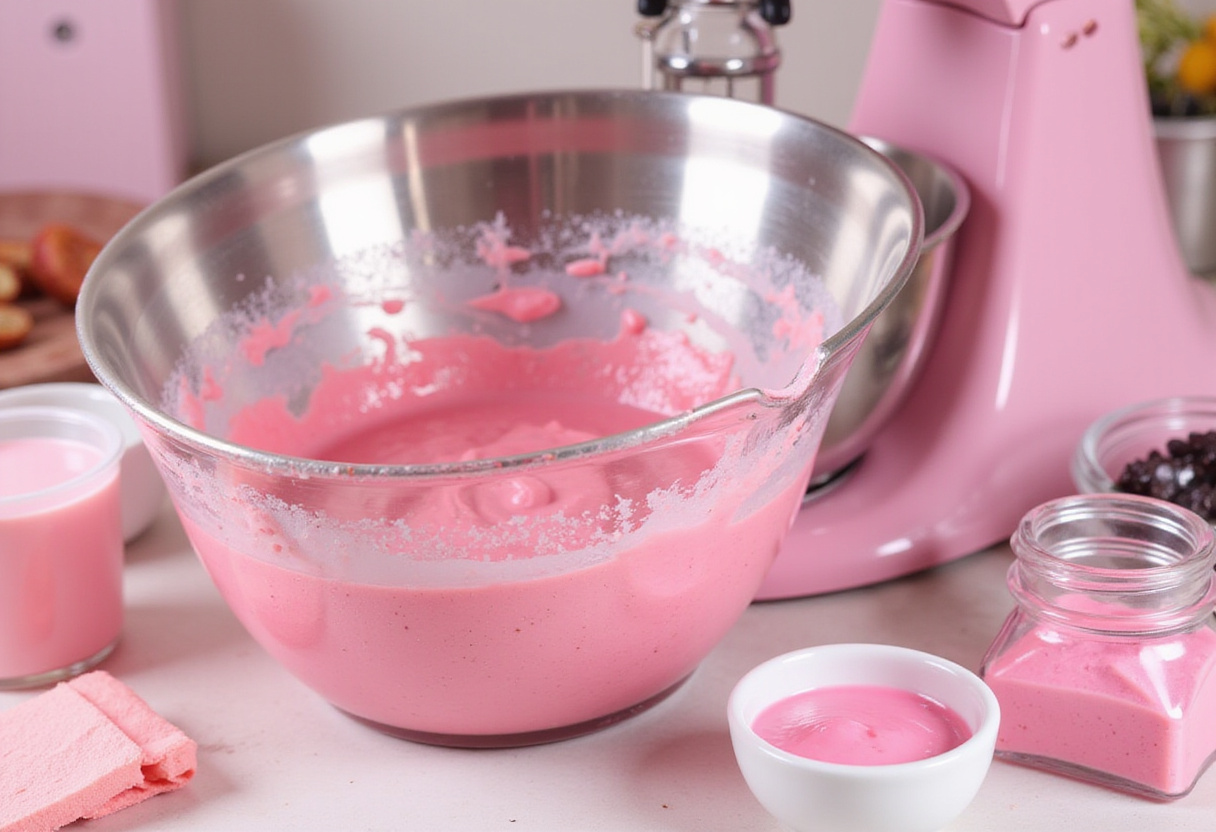
- Food Coloring: Gel food coloring is recommended. Choose your desired dress colors – pink, purple, and blue are popular choices, but let your imagination run wild! Gel coloring provides more vibrant and concentrated color than liquid alternatives.
- Frosting: You’ll need about 4-5 cups of buttercream frosting. Whether you choose homemade or high-quality store-bought, ensure it’s smooth and easy to work with for creating those stunning dress details.
- Barbie Doll: A brand new Barbie doll is essential. Ensure it’s clean and specifically suitable for cake insertion. This is, after all, the centerpiece of your creation.
- Sprinkles and Decorations: Stock up on edible pearls, glitter, and other decorations to add that extra sparkle and enhance the dress. These finishing touches can truly elevate your princess cake.
4. Step-by-Step Instructions: Baking the Barbie Cake
1. Preparing and Baking the Cake Layers
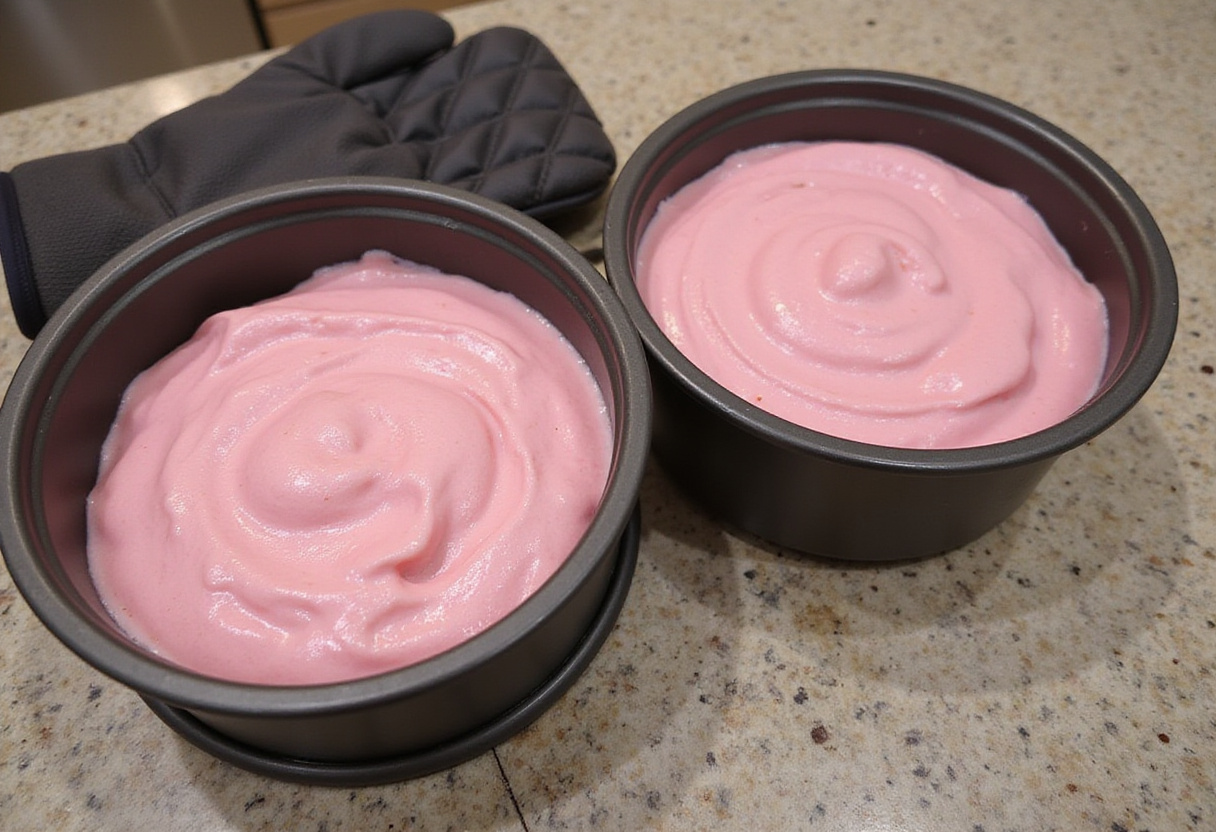
Begin your Barbie cake recipe journey by preparing the cake batter strictly according to the precise instructions on the cake mix box. This is paramount for getting the right consistency and ensuring that your cake layers bake properly. Divide the batter equally into separate bowls and carefully add food coloring to each, achieving your desired array of shades for the cake layers. The colors will really make the final product pop! Pour the vibrantly colored batter into greased and floured round cake pans, filling them evenly. Bake according to the cake mix instructions, being vigilant about time and temperature, and let them cool completely on a wire rack before even thinking about assembling the cake. This initial step is absolutely crucial to ensure a moist and flavorful foundation for your stunning princess cake.
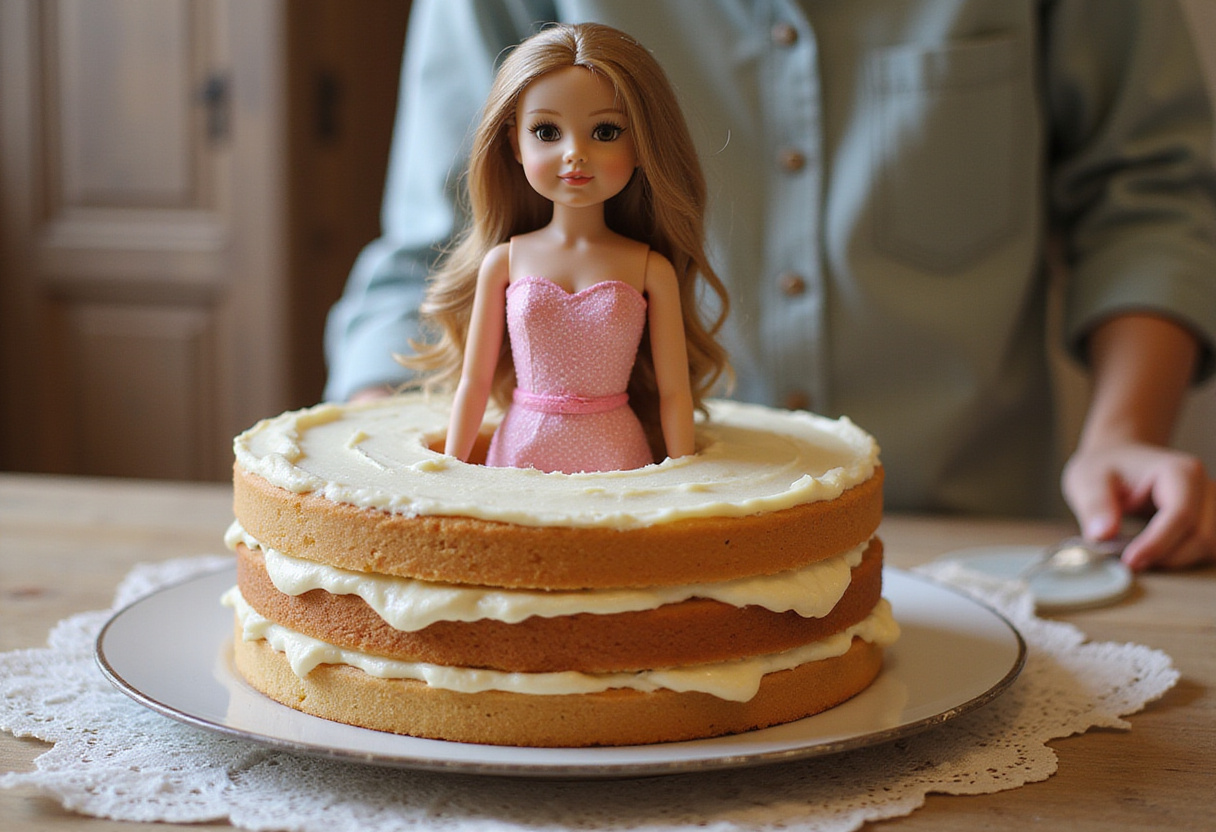
2. Shaping the Cake
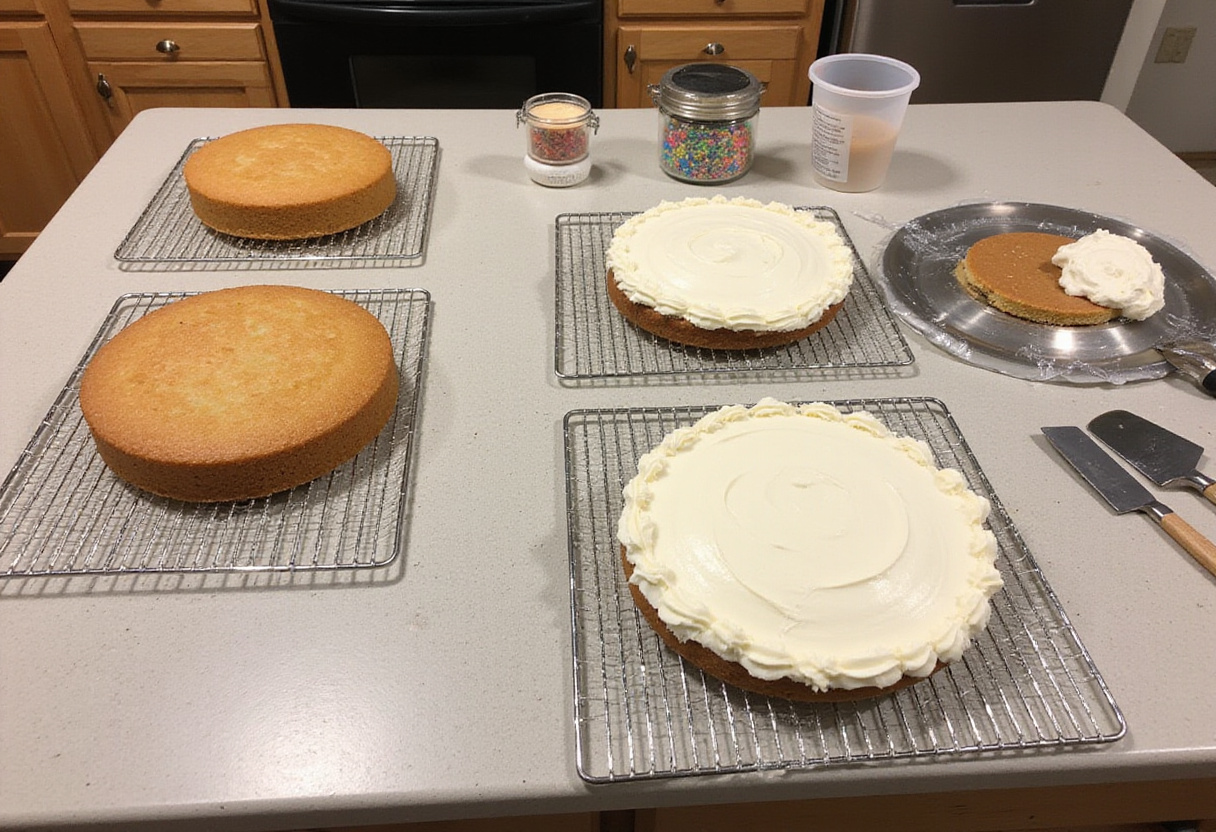
Once the cakes are completely cooled – and it’s important that they are completely cool to avoid any structural issues – level them meticulously by carefully cutting off any rounded tops with a long, serrated knife. This will give you a nice and even surface to work with. Stack the cake layers one on top of the other, using a thin layer of frosting between each to help them stick together. Then, using that same serrated knife, start carving the stacked cakes into the distinct shape of a dress. The overall shape should generally resemble a cone or a bell – that iconic Barbie silhouette. This step in the doll cake recipe is key. It helps create the iconic Barbie doll dress silhouette, so take your time and be precise.
3. Frosting and Decorating the Dress
Now for the fun part! Apply a “crumb coat” – which is essentially a thin layer of frosting – to the entire carved cake. Believe me, this step is important. Chill the cake in the refrigerator for about 30 minutes after applying the crumb coat. This crucial step helps to seal in any loose crumbs, preventing them from mixing with the final frosting layer (which will give your cake a much more professional look). Then, bring out your artistic side and frost the cake with a final, generous layer of buttercream. This is where you can really unleash your creativity, crafting an eye-catching dress design using ruffles, swirls, or any other pattern that comes to mind. This is your chance to make a completely unique princess cake that will be talked about for weeks!
4. Inserting the Barbie Doll
Almost there! Before you insert the doll, wrap the Barbie doll‘s lower body meticulously with plastic wrap to keep it clean and ensure food safety. Then, carefully but confidently make a hole in the exact center of the cake. The hole should be just large enough to accommodate the doll’s body. Gently push the Barbie doll into the cake, setting her securely but carefully. Once the doll is in place, use extra frosting to create a bodice that seamlessly blends with the cake dress. This will really give it that professional look. Finally, add those all-important finishing touches: sprinkles, edible pearls, and a generous dusting of edible glitter to complete the enchanting look of your spectacular Barbie doll cake. The sky’s the limit here, so use your imagination!
5. Tips for a Perfect Princess Cake
- Use a serrated knife to level the cake layers meticulously. This will ensure a stable and even foundation for your cake masterpiece.
- Don’t skip the crumb coat! Chill the cake immediately after applying the crumb coat. This prevents crumbs from ruining your final frosting layer.
- Explore different frosting techniques to create truly unique dress designs. Ruffles, rosettes, and smooth finishes all offer different looks.
- Don’t skimp on quality. Choose high-quality gel food coloring to achieve vibrant and truly appealing dress colors.
- Safety first! Ensure the Barbie doll is scrupulously clean and securely inserted into the cake to avoid any mishaps.
6. Variations on the Barbie Cake Recipe
The best part about this project is how open it is to customization. There are virtually endless possibilities when it comes to customizing your Barbie cake. Get creative and personalize it! Consider these variations:
- Theme Cakes: Perfectly match the cake design to a very specific Barbie doll theme. Mermaid, fairytale, or princess designs are all great starting points.
- Flavor Variations: Use different cake flavors. A rich chocolate fudge or a light lemon poppy seed cake, for example, can beautifully complement various frosting choices.
- Ombre Effect: Create a stunning ombre effect on the dress. Try using different shades of the same color, gradually transitioning from light to dark.
- Fondant Accents: Use fondant to create intricate details, such as delicate flowers, bows, or detailed lace patterns, to adorn the dress.
7. Serving and Storing Your Barbie Doll Cake
Serve your Barbie cake at room temperature for the best possible flavor and the most pleasing texture. If, against all odds, there are leftovers, store them in the refrigerator, making sure to cover the cake tightly with plastic wrap to prevent it from drying out. The cake should stay fresh for up to approximately 3 days. It’s critical to inform your guests (especially children) that a Barbie doll is inside, so everyone can enjoy the cake safely and responsibly. If you don’t want to make the cake yourself, you can always order one from a professional bakery, such as 3 Brothers Bakery.
8. Troubleshooting Common Issues
- Cake Layers Crumbling: If your cake layers are crumbling, make absolutely certain that they are completely cooled before you even begin frosting.
- Frosting Too Soft: A simple fix! Chill the frosting briefly in the refrigerator for a few minutes to attain a firmer consistency before you start using it.
- Barbie Doll Not Secure: If the Barbie doll feels wobbly, use extra frosting around the base to stabilize her in the cake.
9. Conclusion
Creating your very own Barbie cake is not just about baking a cake; it’s a genuinely rewarding and enjoyable experience that undoubtedly brings a sense of wonder and unbridled joy to any celebration. With this comprehensive Barbie cake recipe and all of the expert tips included, you can easily create a stunning princess cake that not only looks absolutely amazing but also tastes absolutely delicious. From carefully baking and precisely stacking the cake layers to meticulously frosting and artistically decorating the dress, every single step of the process presents you with a unique opportunity to showcase your individual creativity and impress any crowd. So, gather all of your key ingredients together, unleash your inner baking artist, and craft a truly unique doll cake recipe masterpiece that will be the undisputed highlight of your next party or special event!
Print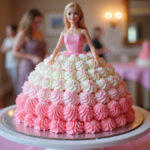
barbie cake
- Total Time: 1 hour 15 minutes
- Yield: 12 servings 1x
- Diet: Vegetarian
Description
Create a magical Barbie cake for princess-themed parties! This doll cake recipe combines delicious homemade cake with vibrant frosting and a Barbie doll centerpiece for a show-stopping dessert.
Ingredients
- 2 boxes of your favorite cake mix (vanilla, chocolate, or strawberry)
- Eggs, oil, and water (as required by the cake mix instructions)
- Gel food coloring (pink, purple, blue, or your desired colors)
- 4–5 cups of buttercream frosting (homemade or store-bought)
- 1 new Barbie doll (clean and suitable for cake insertion)
- Edible pearls, glitter, and sprinkles for decoration
Instructions
- Prepare the cake batter according to the cake mix instructions. Divide the batter into bowls and add food coloring to achieve your desired shades.
- Pour the batter into greased and floured round cake pans. Bake according to the cake mix instructions, and let them cool completely before assembling.
- Once the cakes are cooled, level them by cutting off any rounded tops. Stack the cake layers and use a serrated knife to carve the stacked cakes into a dress shape (cone or bell shape).
- Apply a crumb coat of frosting to the entire cake and chill it in the refrigerator for about 30 minutes.
- Frost the cake with a final layer of buttercream, creating ruffles, swirls, or any design you like for the dress. Use different piping tips to achieve various textures and patterns.
- Wrap the Barbie doll’s lower body with plastic wrap to keep it clean.
- Make a hole in the center of the cake, just large enough to insert the doll.
- Gently push the Barbie doll into the cake, ensuring she is secure.
- Use frosting to create a bodice that blends seamlessly with the cake dress.
- Add sprinkles, edible pearls, and glitter to complete the enchanting look of your Barbie doll cake.
Notes
- Use a serrated knife to level the cake layers for a stable foundation.
- Chill the cake after the crumb coat to prevent crumbs from mixing with the final frosting layer.
- Experiment with different frosting techniques to achieve unique dress designs.
- Choose high-quality food coloring for vibrant and appealing dress colors.
- Ensure the Barbie doll is clean and securely inserted into the cake.
- Store leftover cake in the refrigerator, covered tightly with plastic wrap, for up to 3 days.
- Prep Time: 45 minutes
- Cook Time: 30 minutes
- Category: Dessert
- Method: Baking
- Cuisine: American
Nutrition
- Serving Size: 1 slice
- Calories: 350 Kcal
- Sugar: 40g
- Sodium: 250mg
- Fat: 15g
- Saturated Fat: 8g
- Unsaturated Fat: 6g
- Trans Fat: 0g
- Carbohydrates: 50g
- Fiber: 1g
- Protein: 3g
- Cholesterol: 50mg
Keywords: Barbie cake, doll cake, princess cake, birthday cake, Barbie doll cake, cake recipe, buttercream frosting, party cake, kids cake, dessert


No comment