

Marble Rye Bread Recipe: Swirls of Flavor in Every Slice 🍞🥨🌟
1. Introduction
There’s something undeniably comforting about a slice of freshly baked bread, and when that bread is a beautiful, flavorful marble rye bread, it’s even more special. The delightful combination of light and dark rye dough, swirled together to create an eye-catching pattern, makes this homemade marble rye bread a favorite for sandwiches, toast, or simply enjoying on its own. This article will guide you through creating your own stunning rye marble bread at home, ensuring every loaf is a masterpiece. Whether you’re an experienced baker or just starting out, this recipe will help you create a marble rye loaf that will impress your family and friends. We’ll walk you through each step, offering tips and tricks along the way to ensure baking success. If you’re looking to expand your baking skills, mastering this marble rye recipe is a fantastic starting point!
2. Understanding Marble Rye Bread
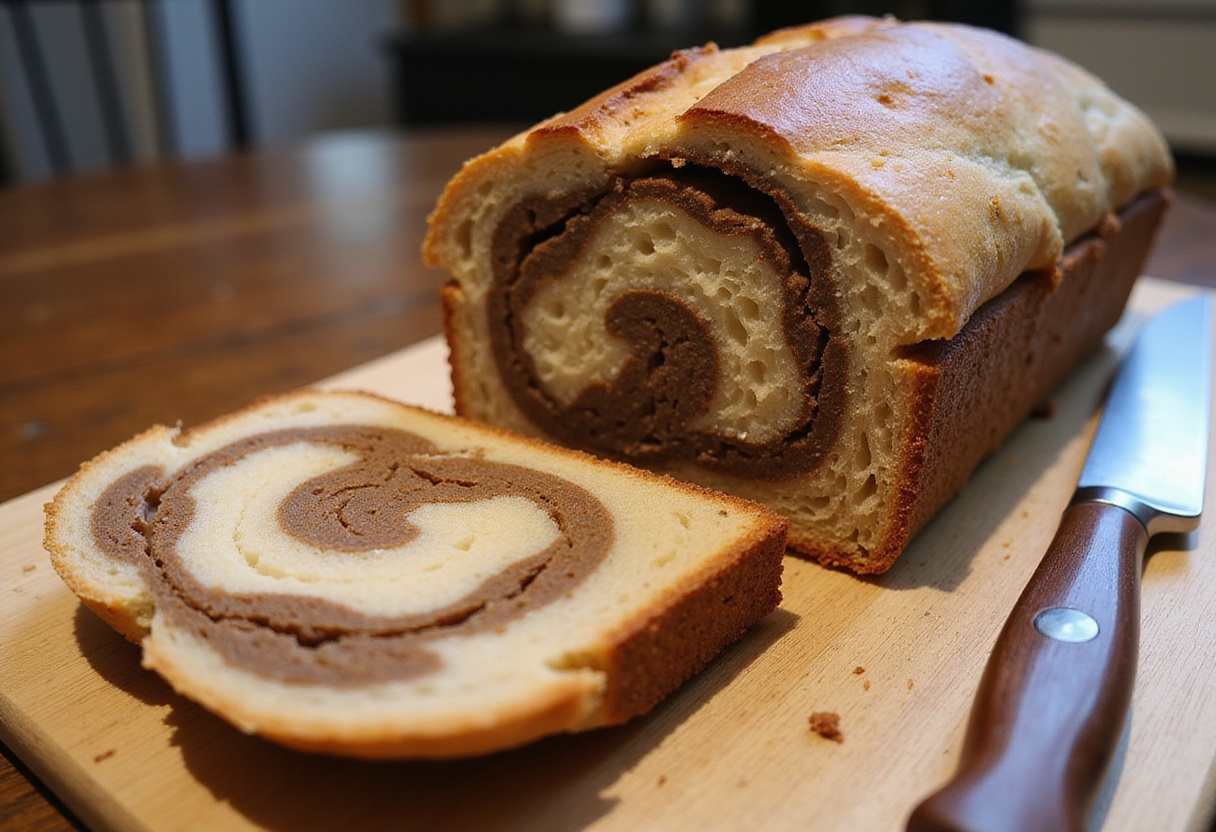
Marble rye bread is a variation of rye bread characterized by its distinctive marbled pattern. This effect is achieved by combining two different rye doughs, one light and one dark, before baking. The contrast in color not only makes the bread visually appealing but also adds to its unique flavor profile. The dark dough typically includes ingredients like cocoa powder, molasses, or coffee to deepen its color and enhance its taste. The result is a loaf that is both beautiful and delicious, perfect for a variety of culinary uses. This bread isn’t just about looks; it’s about the delightful combination of flavors and textures that make each bite a memorable experience.
3. Key Ingredients for the Perfect Marble Rye Loaf
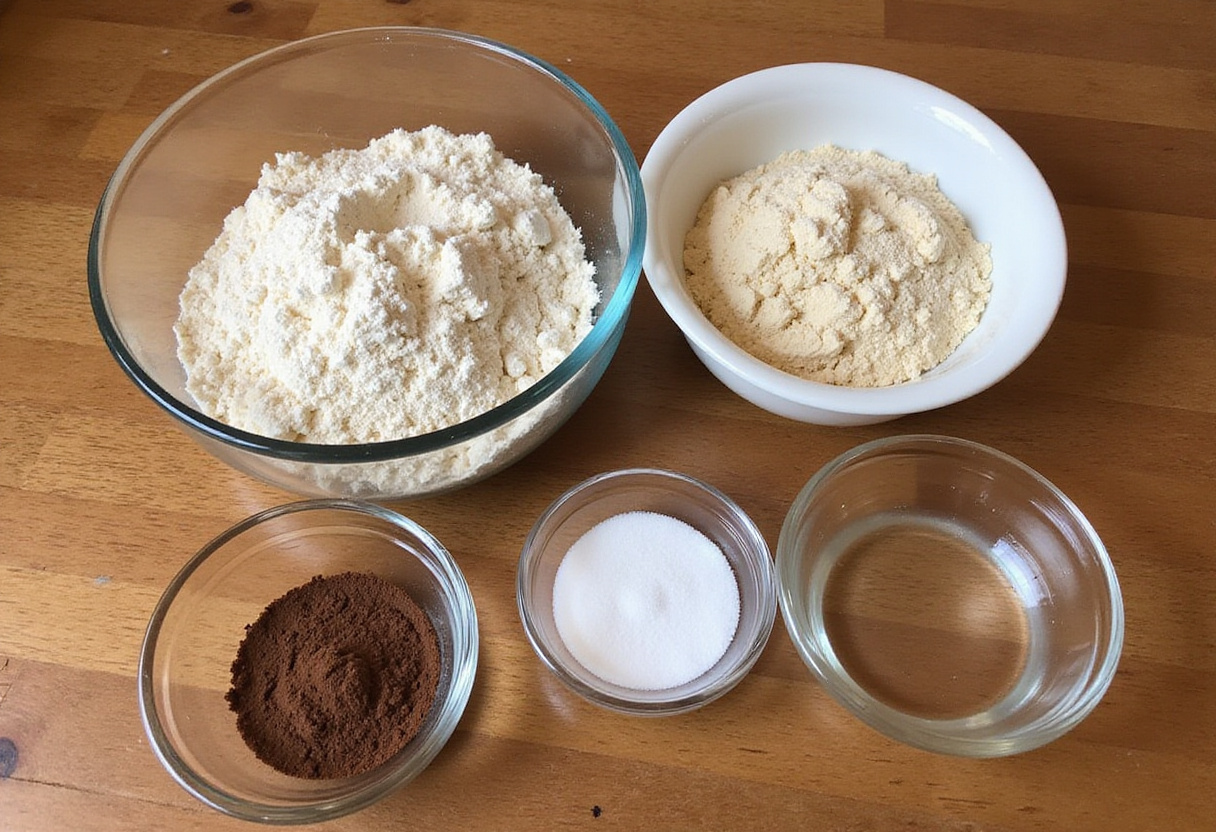
To create an exceptional marble rye loaf, you’ll need a specific set of ingredients. Here’s what you’ll need:
- Rye Flour: The base of the bread, providing that distinctive rye flavor. Different types of rye flour will affect the taste and texture, so experiment to find your favorite.
- Bread Flour: Adds structure and gluten for a good rise. Using bread flour ensures a chewy and satisfying crumb.
- Water: Hydrates the flour, essential for dough development. The water temperature can also influence the yeast activity, so use lukewarm water for best results.
- Yeast: The leavening agent, ensuring a light and airy texture. Make sure your yeast is fresh for optimal rising.
- Salt: Enhances the flavors and controls the yeast activity. Don’t skip the salt; it’s crucial for flavor balance.
- Cocoa Powder, Molasses, or Coffee: For the dark dough, providing color and depth of flavor. Each of these ingredients will impart a slightly different flavor, so choose based on your preference.
- Caraway Seeds: Optional, but adds a traditional rye flavor. If you’re a fan of that classic rye taste, don’t hesitate to add caraway seeds.
Ensuring you have high-quality ingredients will make a significant difference in the final product. Fresh yeast, in particular, is crucial for a good rise and overall texture. For a reliable yeast option, consider recipes from trusted sources like Red Star Yeast, which offers a fantastic marbled rye bread recipe.
4. Step-by-Step Guide to Making Marble Rye Bread
Follow these steps to create your own stunning homemade marble rye bread. Each step is crucial for achieving the perfect loaf, so pay close attention to the details!
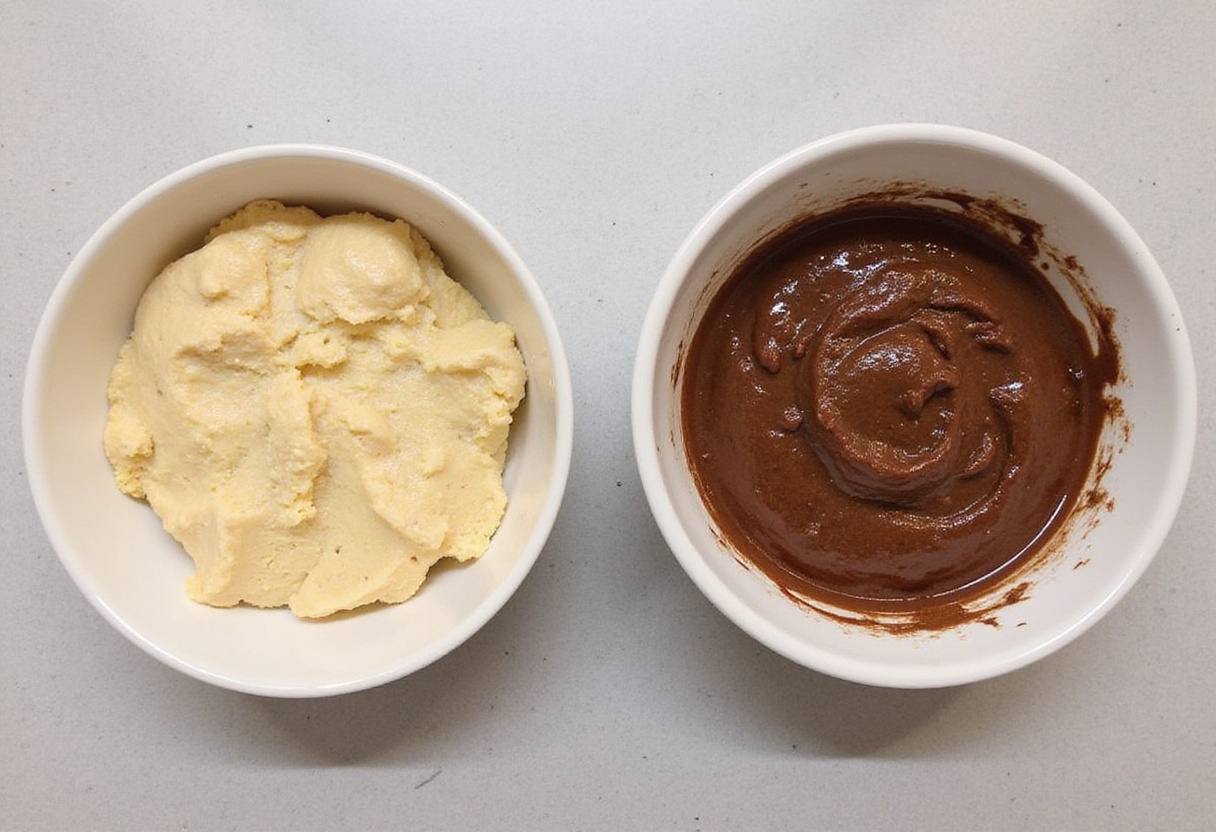
Step 1: Preparing the Doughs
First, you’ll need to prepare both the light and dark rye doughs separately.
- Light Dough: In a large bowl, combine rye flour, bread flour, water, yeast, and salt. Mix until a shaggy dough forms. Knead for about 5-7 minutes until smooth and elastic. This step is essential for developing the gluten, which gives the bread its structure.
- Dark Dough: In a separate bowl, combine rye flour, bread flour, water, yeast, salt, and your choice of cocoa powder, molasses, or strong coffee. Mix and knead as you did with the light dough. The dark dough might feel slightly different due to the added ingredients, but aim for a similar smooth and elastic consistency.
Step 2: Proofing the Doughs
Place both doughs in separate, lightly oiled bowls. Cover them with plastic wrap and let them rise in a warm place for about 1-1.5 hours, or until doubled in size. Proofing allows the yeast to work its magic, creating air bubbles that give the bread its light and airy texture. A warm environment helps accelerate this process.
Step 3: Creating the Marble Effect
This is where the magic happens! The marbling technique is what makes this bread so visually stunning.
- Gently deflate both doughs. This removes any large air pockets and prepares the dough for shaping.
- Divide each dough into two or three pieces. Dividing the dough makes it easier to create the ropes.
- Roll each piece into a rope shape. Aim for ropes that are roughly the same length for a consistent marble pattern.
- Twist the light and dark ropes together to create a marbled effect. Don’t twist too tightly, as this can prevent the bread from rising properly.
Step 4: Baking Your Masterpiece
Place the twisted dough into a greased loaf pan. Cover and let it rise for another 30-45 minutes. This second proofing allows the dough to rise further, resulting in a taller and lighter loaf.
- Preheat your oven to 375°F (190°C). Preheat ensures the oven is at the correct temperature for even baking.
- Bake the marble rye loaf for 30-40 minutes, or until the crust is golden brown and the internal temperature reaches 200°F (93°C). Use a thermometer to check the internal temperature for accuracy.
- Let it cool in the pan for 10 minutes before transferring it to a wire rack to cool completely. Cooling in the pan prevents the bread from becoming soggy.
5. Tips for Achieving the Best Marble Rye Bread
Here are some expert tips to help you perfect your marble rye bread. These tips can make a significant difference in the outcome of your loaf!
- Use a Kitchen Scale: Measuring ingredients by weight ensures accuracy and consistency in your bread. Baking is a science, and precision is key.
- Control the Dough Temperature: Keeping the dough at a consistent temperature during proofing helps with even rising. A stable temperature promotes consistent yeast activity.
- Don’t Over-knead: Over-kneading can result in a tough loaf. Knead until the dough is smooth and elastic. Over-kneading develops too much gluten, resulting in a dense texture.
- Proper Cooling: Allowing the bread to cool completely before slicing prevents a gummy texture. Slicing the bread while it’s still warm can result in a sticky, unpleasant texture.
6. Variations and Creative Twists
Want to get creative with your rye marble bread? Here are a few ideas. Experimenting with flavors and ingredients can lead to unique and delicious variations!
- Add Seeds: Incorporate sesame, poppy, or sunflower seeds for added texture and flavor. Seeds add a delightful crunch and nutty flavor.
- Use Different Flours: Experiment with whole wheat flour for a nuttier taste. Whole wheat flour adds a rustic flavor and a slightly denser texture.
- Incorporate Spices: Add a pinch of coriander or fennel for a unique twist. Spices can enhance the overall flavor profile and add warmth.
- Cheese Marble Rye: Add shredded cheese for a savory surprise. Cheese adds a creamy, savory element that complements the rye flavor.
7. Serving Suggestions
Marble rye bread is incredibly versatile. Here are some serving suggestions. From classic sandwiches to creative culinary applications, this bread is a true crowd-pleaser!
- Sandwiches: Perfect for Reubens, turkey, or pastrami sandwiches. The robust flavor of marble rye pairs perfectly with savory fillings.
- Toast: Enjoy it with butter, jam, or avocado. Toasted marble rye is delicious with a variety of toppings.
- Croutons: Cube and bake for flavorful croutons in salads or soups. Homemade croutons add a delightful crunch and flavor to any dish.
- Bread Pudding: Use it as the base for a rich and savory bread pudding. Marble rye adds a unique and delicious twist to classic bread pudding.
8. Troubleshooting Common Issues
Even with the best recipe, things can sometimes go wrong. Here are some common issues and how to troubleshoot them. Understanding potential problems and how to fix them will make you a more confident baker!
- Dense Bread: Ensure your yeast is fresh and that your dough has proofed properly. Expired yeast or insufficient proofing time can result in a dense loaf.
- Uneven Marbling: Be gentle when twisting the doughs together to avoid overmixing. Overmixing can blend the doughs together, resulting in a less defined marble pattern.
- Burnt Crust: Lower the oven temperature slightly and cover the loaf with foil during the last part of baking. This prevents the crust from burning while ensuring the inside is fully cooked.
9. Conclusion
Creating a beautiful and delicious marble rye bread at home is a rewarding experience. With attention to detail and a little practice, you’ll be able to produce a homemade marble rye bread that rivals anything you can buy in a store. Enjoy the process, experiment with flavors, and savor every slice of your rye marble bread. Happy baking!
Print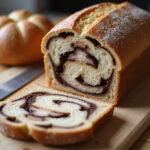
marble rye bread recipe
- Total Time: 2 hours 5 minutes
- Yield: 1 loaf
- Diet: Vegetarian
Description
Create a stunning marble rye bread at home with this easy-to-follow recipe. Enjoy the delightful combination of light and dark rye dough, perfect for sandwiches, toast, or enjoying on its own. This homemade marble rye bread will impress your family and friends with its beautiful swirls and rich flavor.
Ingredients
- Rye Flour: Provides the distinctive rye flavor.
- Bread Flour: Adds structure and gluten for a good rise.
- Water: Hydrates the flour, essential for dough development.
- Yeast: The leavening agent, ensures a light and airy texture.
- Salt: Enhances the flavors and controls the yeast activity.
- Cocoa Powder, Molasses, or Coffee: For the dark dough, providing color and depth of flavor.
- Caraway Seeds: Optional, but adds a traditional rye flavor.
Instructions
- Light Dough: In a large bowl, combine rye flour, bread flour, water, yeast, and salt. Mix until a shaggy dough forms. Knead for about 5-7 minutes until smooth and elastic.
- Dark Dough: In a separate bowl, combine rye flour, bread flour, water, yeast, salt, and your choice of cocoa powder, molasses, or strong coffee. Mix and knead as you did with the light dough.
- Place both doughs in separate, lightly oiled bowls. Cover them with plastic wrap and let them rise in a warm place for about 1-1.5 hours, or until doubled in size.
- Gently deflate both doughs.
- Divide each dough into two or three pieces.
- Roll each piece into a rope shape.
- Twist the light and dark ropes together to create a marbled effect.
- Place the twisted dough into a greased loaf pan. Cover and let it rise for another 30-45 minutes.
- Preheat your oven to 375°F (190°C).
- Bake the marble rye loaf recipe for 30-40 minutes, or until the crust is golden brown and the internal temperature reaches 200°F (93°C).
- Let it cool in the pan for 10 minutes before transferring it to a wire rack to cool completely.
Notes
- Use a Kitchen Scale: Measuring ingredients by weight ensures accuracy and consistency in your bread.
- Control the Dough Temperature: Keeping the dough at a consistent temperature during proofing helps with even rising.
- Don’t Over-knead: Over-kneading can result in a tough loaf. Knead until the dough is smooth and elastic.
- Proper Cooling: Allowing the bread to cool completely before slicing prevents a gummy texture.
- Prep Time: 30 minutes
- Cook Time: 35 minutes
- Category: Bread
- Method: Baking
- Cuisine: American
Nutrition
- Serving Size: 1 slice (approx. 1 oz)
- Calories: 85 Kcal
- Sugar: 2g
- Sodium: 180mg
- Fat: 1g
- Saturated Fat: 0.2g
- Unsaturated Fat: 0.8g
- Trans Fat: 0g
- Carbohydrates: 17g
- Fiber: 2g
- Protein: 3g
- Cholesterol: 0mg
Keywords: marble rye bread, rye bread recipe, homemade bread, marble rye loaf recipe, rye marble bread recipe, baking, bread recipe


No comment